Tutorial 4: Screen
Hello again! In this tutorial we'll be looking at what the screen is, the basics of how it works, and how we can use it in our programs.
The screen is a huge collection of tiny, tiny little lights called pixels. There are lots and lots of them. In your Nintendo Switch screen, there are a whopping 921600 of them. Almost a million!
Whenever your screen is on, whenever you play a game, browse the eShop, or simply look at the HOME menu, your Nintendo Switch is changing these 921600 little lights at an amazing speed. About 60 times per second, actually.
Just think about that for moment - it should blow your mind!
X and Y
You're probably familiar with the x and y axis already. But, just in case you've never heard of them before let's have a quick look.
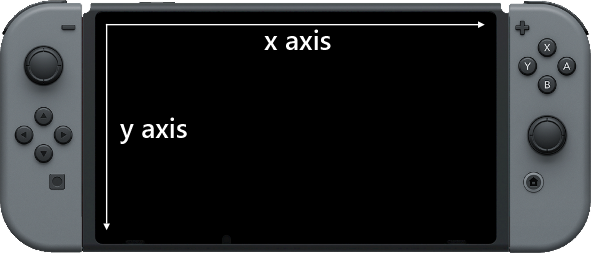
The huge collection of pixels we mentioned is arranged into an x axis and a y axis. If something moves along the x axis, it moves left or right. If something moves along the y axis, it moves up or down!
Take a look at this picture to see what we mean:

Notice the direction the arrows are pointing? This tells us the way the numbers increase along the axes.
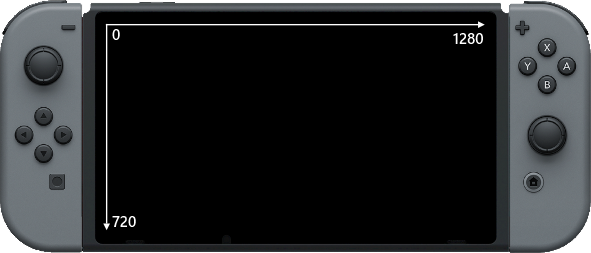
Both axes begin at 0 and go up 1 pixel at a time, across and down the screen.
Your Nintendo Switch screen has 1280 pixels on the x axis and 720 pixels on the y axis. Multiply them together to get the 921600 number we mentioned earlier!
Take a look at this image to see how the numbers increase along the axes:

The zero in the top left corner tells us that 0 on the x and y axis is in the top left corner of the screen.
The maximum number for the x axis is the furthest right part of the screen, and the maximum number for the y axis is the bottom of the screen.
TV Mode and Handheld Mode
Something important to bear in mind is that the screen resolution (the number of pixels in a screen) changes between Handheld Mode and TV Mode. While your Nintendo Switch Console is in the dock, the screen resolution will be 1920 by 1080 pixels, rather than 1280 by 720.
Using Screen Co-ordinates in a Program
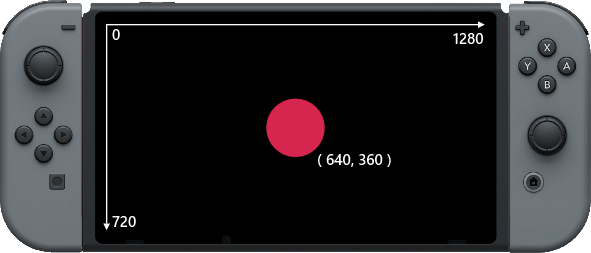
Let's say we want to put a circle right in the middle of our screen. We would need to know the halfway point on both axes. Half of 1280 is 640, and half of 720 is 360.
If we use 640 and 360 as co-ordinates for an x and y position on the screen, we should get something like this:

Let's see what this would look like in code.
  1. loop
  2.     clear()
  3.     circle( 640, 360, 100, 32, fuzepink, false )
  4.     update()
  5. repeat
Nice and simple. We have a loop, we use the clear() function to clear the screen and the update() function to send our information to the screen.
Take a look at line 3. This line is responsible for creating the circle.
The circle() function needs 6 pieces of information in brackets, separated by commas.
The first number in the brackets is the x axis position. The second number is of course the y axis position! There's our co-ordinates!
The third number (100) is the size of the circle. Actually, the real name for this is the radius of the circle - the distance in pixels from the middle of the circle to the edge. If our circle has a radius of 100 pixels, it means the circle is 200 pixels wide in total.
Next up, we have the number of sides. Yes, you read that right. This circle has 32 sides. We see it as very smooth because the sides are incredibly small. We can change this number to change how our circle looks - in fact, we can turn it into a totally different shape by changing this number! Try putting some different numbers here to see what we mean.
Moving the Circle
If we want out circle to move, we'll need some variables to store the x and y positions.
Change your code to look like the program below. It won't behave any differently just yet.
  1. x = 640
  2. y = 360
  3. size = 100
  4.
  5. loop
  6.     clear()
  7.     circle( x, y, size, 32, fuzepink, false )
  8.     update()
  9. repeat
Now we have used variables to display the circle on screen. Everything is exactly the same, except we can change these during the program to move the circle.
Remember += from the variables tutorial? We'll be using this here. We are only adding one line of code, check it out:
  1. x = 640
  2. y = 360
  3. size = 100
  4.
  5. loop
  6.     clear()
  7.     circle( x, y, size, 32, fuzepink, false )
  8.     x += 1
  9.     update()
 10. repeat
We've added one line just after our circle() function. This line increases the value of the x variable by 1 each time the loop repeats. Because we are using the x variable as the circle's x position, this will cause the circle to move across the screen.
Run the program to see! You might notice a little problem though... The circle doesn't stop!
Making the Circle Bounce
Once the x variable becomes too big our circle is being drawn off screen. In order to make the circle bounce off the edge and come back, we'll need a couple of things.
First, we must understand that the reason the circle moves in any particular direction is because of what we do to the x or y position.
For now, let's just think about the x axis
If we increase the x position, we are moving to the right. If we decrease the x position, we move to the left.
8. x += 1This is the line responsible for moving the circle.
The speed the circle moves is entirely down to the number we increase the x variable by. At the moment, we are increasing it by 1 pixel each time the line is read. If we increase this number, the circle moves faster. Decrease the number and it will move slower. So far so good?
If we store this number in a variable, we can do some interesting things. Change your code to look like this:
  1. x = 640
  2. y = 360
  3. size = 100
  4. xSpeed = 3
  5.
  6. loop
  7.     clear()
  8.     circle( x, y, size, 32, fuzepink, false )
  9.     x += xSpeed
 10.     update()
 11. repeat
We've created a new variable on line 4 called xSpeed. This variable is used to control the speed of circle along the x axis, so it makes sense to name it something like this!
The x += 1 line has changed too. We now use the variable in this line instead of just a number.
Right, now we're ready to start making the ball bounce!
The x variable is increasing all the time. The screen is 1280 pixels wide. When x becomes bigger than the width of the screen, we know our circle is off screen. We need to do something when that happens.
For this, we'll need an if statement. Take a look below:
  1. x = 640
  2. y = 360
  3. size = 100
  4. xSpeed = 3
  5.
  6. loop
  7.     clear()
  8.     circle( x, y, size, 32, fuzepink, false )
  9.     x += xSpeed
 10.     if x > gwidth() then
 11.         xSpeed = -xSpeed
 12.     endif
 11.     update()
 12. repeat
Our if statement is on line 10. We check if the x variable has become bigger than (>) gwidth() (the width of screen). When you run this program, the ball should bounce off the right hand side of the screen. If you look carefully, you might notice something not quite right.
The x variable is the middle of our circle. So, when x is bigger than the width of the screen, half of the circle is already gone!
To get the ball bouncing properly off the edge, we must check if x + size has become bigger than gwidth(). Remember, the size variable is being used as the radius of the circle, which is half of the total width. Because of this, x + size gives us the exact edge of the circle. Let's modify the code slightly:
  1. x = 640
  2. y = 360
  3. size = 100
  4. xSpeed = 3
  5.
  6. loop
  7.     clear()
  8.     circle( x, y, size, 32, fuzepink, false )
  9.     x += xSpeed
 10.     if x + size > gwidth() then
 11.         xSpeed = -xSpeed
 12.     endif
 13.     update()
 14. repeat
Alright! Now we're bouncing properly... But we have another problem. The ball just goes straight off the other side of the screen!
When x becomes too big, the circle goes off the right hand side, but if x becomes too small it goes off the left!
Before, x was becoming bigger than gwidth(). However, the left side of the screen is 0 pixels. So our problem is that that x has become less than 0.
There's a very clever solution to this problem:
  1. x = 640
  2. y = 360
  3. size = 100
  4. xSpeed = 3
  5.
  6. loop
  7.     clear()
  8.     circle( x, y, size, 32, fuzepink, false )
  9.     x += xSpeed
 10.     if x + size > gwidth() or x - size < 0 then
 11.         xSpeed = -xSpeed
 12.     endif
 13.     update()
 14. repeat
We can simply add an or to our if statement for this one. The right hand side of the ball is x + size, but the left side is x - size. So, we check if x - size has become less than 0. If it does, we simply do the exact same thing as before. We make xSpeed negative.
But xSpeed is already negative! Well, because of the magic of maths, when you make a negative number negative, it becomes positive. Two wrongs do not make a right, but two negatives do make a positive!
If xSpeed is positive, xSpeed = -xSpeed makes it negative.
If xSpeed is negative, xSpeed = -xSpeed makes it positive!
This will cause our ball to bounce neatly around the x axis.
Okay, let's do the same with the y axis to finish this project. Feel free to try for yourself, but check out the code below if you need help:
  1. x = 640
  2. y = 360
  3. size = 100
  4. xSpeed = 3
  5. ySpeed = 3
  6.
  7. loop
  8.     clear()
  9.     circle( x, y, size, 32, fuzepink, false )
 10.     x += xSpeed
 11.     y += ySpeed
 12.     if x + size > gwidth() or x - size < 0 then
 13.         xSpeed = -xSpeed
 14.     endif
 15.     if y + size > gheight() or y - size < 0 then
 16.         ySpeed = -ySpeed
 17.     endif
 18.     update()
 19. repeat
Make it Awesome!
What we've just created are the basics of the game Pong! All we would need now are a couple of bats and a score. We won't be adding this to the program here, but check out the demo programs for a full version of pong to play around with.
What we can do, however, is really make this program more visually exciting.
The first thing we do in the loop is clear() the screen. We must have this to see a clean moving ball, otherwise we will see all of the previous circles that have been drawn. This actually looks very cool indeed. Try deleting the clear() line.
  1. x = 640
  2. y = 360
  3. size = 100
  4. xSpeed = 3
  5. ySpeed = 3
  6.
  7. loop
  8.     circle( x, y, size, 32, fuzepink, false )
  9.     x += xSpeed
 10.     y += ySpeed
 11.     if x + size > gwidth() or x - size < 0 then
 12.         xSpeed = -xSpeed
 13.     endif
 14.     if y + size > gheight() or y - size < 0 then
 15.         ySpeed = -ySpeed
 16.     endif
 17.     update()
 18. repeat
Now we see a line being drawn all over the screen. Try changing the false in the circle() line to true to see a big
difference.
8. circle( x, y, size, 32, fuzepink, true )This will give us an outline of a circle instead.
Try changing the 32 in the circle() line to totally change the shape. See what it looks like with a 3!
8. circle( x, y, size, 3, fuzepink, true )Now let's really step things up.
It would be truly awesome if we could change the colours while we draw the circles for a beautiful rainbow effect.
This next piece of code is going to look quite difficult to understand, and we're certainly not going to explain it all in this tutorial as it wouldn't quite be the right place. However, the end result is so cool that we thought it would be best to include it here to give you a chance to play.
To achieve the colour changing rainbow effect we are changing the red, green and blue (RGB) values of a colour vector. Confused? Fear not, you'll learn all about vectors in the later tutorials.
All of the important settings to change in the program are in the variables at the start of the program. Change these settings around to see what differences you can make!
Copy the code below into the editor:
  1. // circle properties
  2. x = gwidth() / 2
  3. y = gheight() / 2
  4. radius = 100
  5. sides = 6
  6. outline = false
  7.
  8. // speed variables
  9. xSpeed = 33
 10. ySpeed = 66
 11.
 12. // colour variables
 13. cSpeed = 0.01
 14. col = { 1, 0, 0, 1 }
 15.
 16. loop
 17.     if col.r > 0 and col.b <= 0 then
 18.         col.r -= cSpeed
 19.         col.g += cSpeed
 20.     else
 21.         if col.g > 0 then
 22.             col.g -= cSpeed
 23.             col.b += cSpeed
 24.         else
 25.             col.b -= cSpeed
 26.             col.r += cSpeed
 27.         endif
 28.     endif
 29.     circle( x, y, radius, sides, col, outline )
 30.     x += xSpeed
 31.     y += ySpeed
 32.     if x + radius > gwidth() or x - radius < 0 then
 33.         xSpeed = -xSpeed
 34.     endif
 35.     if y + radius > gheight() or y - radius < 0 then
 36.         ySpeed = -ySpeed
 37.     endif
 38.     update()
 39. repeat
There we have it! Run this program to see some rainbow patterns appear on screen. Change the radius, sides and outline variables to experiment with different types of shapes.
Change the xSpeed and ySpeed variables to change the pattern that is drawn.
Change the cSpeed variable to speed up or slow down the colour change effect.
Have fun, and see you in the next tutorial!
Functions and Keywords used in this tutorial
circle(), clear(), gWidth(), gHeight(), loop, repeat, update()