
Tutorial 11: Loading and Drawing an Image
Hello there! Great to see you again.
In this tutorial we'll be going over the basics of loading images from the FUZE4 Nintendo Switch media browser and drawing them to the screen using the built-in functions.
We'll also do some diving into what can be done to scale, warp and rotate an image for some customisation!
When using an image from the FUZE4 Nintendo Switch media, we must first load the image and assign it to a variable.
To do this, we use the loadImage function:
1. img = loadImage()In FUZE4 Nintendo Switch, when you type the loadImage() function and put the cursor in the brackets, you'll notice a glowing outline around the "media" key on the on-screen keyboard. Click this to be taken to the media browser.
In the media browser you can select an asset you'd like to use and FUZE will let you paste the filename, in speech marks, into your code.
We've chosen an image for now from the artist Selavi.
1. img = loadImage( "Selavi Games/JapaneseSetting", false )Notice the false in the loadImage() arguments. This argument tells FUZE whether or not to apply a filter to the image. We do not want a filter here, so we put a false.
Alright we now have the image file saved into a variable called img (short for image!). We can now use this variable in many other functions.
Let's start by simply drawing our image to the screen. We'll need the standard clear() and update() loop we all know and love!
  1. img = loadImage( "Selavi Games/JapaneseSetting", false )
  2.
  3. loop
  4.     clear()
  5.
  6.     update()
  7. repeat
All we need now is to add the drawImage() function!
  1. img = loadImage( "Selavi Games/JapaneseSetting", false )
  2.
  3. loop
  4.     clear()
  5.
  6.     drawImage( img, 0, 0, 1 )
  7.
  8.     update()
  9. repeat
Run the program to see the image displayed very nicely on screen. Lovely!
drawImage()
Let's take a look at that function in more detail and see exactly what's going on.
The first argument in the brackets is the variable we've stored the image file in. Easy!
The next two arguments are the x and y screen positions you'd like to draw the image to. 0, 0 is the very top left corner of the screen.
The last argument is the scale multiplier. This number is used to multiply the dimensions of the image when we draw it on screen.
We've used a 1 here to put the image on screen in its actual size. Let's change that to something smaller:
  1. img = loadImage( "Selavi Games/JapaneseSetting", false )
  2.
  3. loop
  4.     clear()
  5.
  6.     drawImage( img, 0, 0, 0.1 )
  7.
  8.     update()
  9. repeat
With a scale of 0.1 we are making the image ten times smaller.
Let's get a little fancier and use the more complicated drawImageEx() function to manipulate the image.
drawImageEx
Rather than using the regular drawImage function, by using drawImageEx we get access to far more control over the image. There are a few more arguments needed for this function, take a look below:
  1. img = loadImage( "Selavi Games/JapaneseSetting", false )
  2. xPos = gwidth() / 2
  3. yPos = gheight() / 2
  4. rotation = 0
  5. wScale = 0.7
  6. hScale = 0.7
  7. r = 1
  8. g = 1
  9. b = 1
 10. a = 1
 11. originX = 0
 12. originY = 0
 13.
 14. loop
 15.     clear()
 16.
 17.     drawImageEx( img, xPos, yPos, rotation, wScale, hScale, r, g, b, a, originX, originY )
 18.
 19.     update()
 20. repeat
Wow, would you take a look at all those arguments! By using drawImageEx() we can control almost everything about the image.
To make the function a little clearer, we've used variables at the top of the program to show exactly what each argument is doing, laid out in the same order they appear in the function itself.
The first three arguments are ones we're already familiar with. As we know, img is the variable which stores the image file. The next two arguments, xPos and yPos, are the x and y positions of where we want the image to be drawn.
Rotation
The next argument is where things get a little more interesting! This argument controls the rotation angle of the image. At the moment, the rotation variable is a 0. If we were to make this 180, the image would flip upside-down.
Scale
The next two arguments are the width and height scale of the image. With both of these arguments as 1, the image will be drawn at its regular scale. Changing these numbers will give the effect of stretching the image. For example, changing the hScale variable to 0.5 will make the image twice as wide as it is tall.
RGBA
The next arguments are very cool indeed! We have separate values here for the red, blue, green and alpha elements of the image. Try changing the r, g and b variables to 1, 0 and 0 for a red tinted image. Try any numbers you like between 0 and 1 to make your own tint!
Origin
This one is a little strange to get the old head around. The origin point of an image is where the image is drawn from. By default, the origin is set to 0 on both the x and y axes. Remember, when we talk about the screen, (0, 0) refers to the top left corner. However, when it comes to images (0, 0) is the middle of the image. Take a look at the image below:
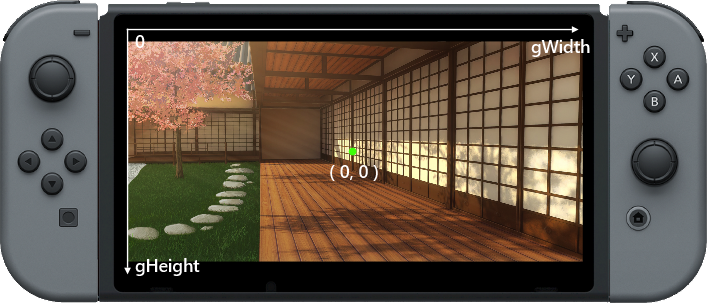
With an image origin of (0, 0) and an x and y position of (gwidth() / 2, gheight() / 2), our image will be printed right in the middle of the screen.
What happens if we change the origin, but keep the x and y positions the same?

If we set the x origin to -imageW(img)/2 (minus half the width of the image), while keeping the x and y locations of the image the same, our origin is on the left-most side of the image, and the image will be drawn from that point on the screen. Note the use of a new function imageW() that returns the width of the image (in pixels). Its best friend imageH() returns the height.
Manipulating an Image in a Program
Let's adjust the code a little to make interesting use of these features. First, we'll rotate the image during the loop:
  1. img = loadImage( "Selavi Games/JapaneseSetting", false )
  2. xPos = gwidth() / 2
  3. yPos = gheight() / 2
  4. rotation = 0
  5. wScale = 0.7
  6. hScale = 0.7
  7. r = 1
  8. g = 1
  9. b = 1
 10. a = 1
 11. originX = 0
 12. originY = 0
 13.
 14. loop
 15.     clear()
 16.
 17.     drawImageEx( img, xPos, yPos, rotation, wScale, hScale, r, g, b, a, originX, originY )
 18.
 19.     rotation += 1
 20.
 21.     update()
 22. repeat
Run the program to see the image spinning on screen.
Notice that the image is rotating around the origin. If we were to change the origin, we also change the point of rotation. Let's give that a try:
  1. img = loadImage( "Selavi Games/JapaneseSetting", false )
  2. xPos = gwidth() / 2
  3. yPos = gheight() / 2
  4. rotation = 0
  5. wScale = 0.7
  6. hScale = 0.7
  7. r = 1
  8. g = 1
  9. b = 1
 10. a = 1
 11. originX = 800
 12. originY = 300
 13.
 14. loop
 15.     clear()
 16.
 17.     drawImageEx( img, xPos, yPos, rotation, wScale, hScale, r, g, b, a, originX, originY )
 18.
 19.     rotation += 1
 20.
 21.     update()
 22. repeat
All we have done is changed the value of the originX and originY variables to 800 and 300 respectively. Run the program to see that our rotation looks very different!
Alright. Enough spinning around. By manipulating the red, green, blue and alpha values we can control the lighting of the image in a very convincing way:
  1. img = loadImage( "Selavi Games/JapaneseSetting", false )
  2. xPos = gwidth() / 2
  3. yPos = gheight() / 2
  4. rotation = 0
  5. wScale = 0.7
  6. hScale = 0.7
  7. r = 1
  8. g = 1
  9. b = 1
 10. a = 1
 11. originX = 0
 12. originY = 0
 13.
 14. loop
 15.     clear()
 16.     j = controls( 0 )
 17.
 18.     a += j.ly / 50
 19.     g += j.ly / 50
 20.     r += j.ly / 50
 21.
 22.     if r < 0 then r = 0 endif
 23.     if g < 0 then g = 0 endif
 18.
 19.     drawImageEx( img, xPos, yPos, rotation, wScale, hScale, r, g, b, a, originX, originY )
 20.
 21.     update()
 22. repeat
Run the program and move the left control stick up and down to control the lighting. Moving the control stick down makes the image darker and more blue, whereas moving the control stick upward will make the image brighter. We've also changed our origin back to (0, 0) in this example.
The new lines added are from 16 to 23. First, we call the controls() function to access the Joy-Con controllers. We are using a variable called j to store the state of the controls.
On lines 18 to 20 we use the left control stick to change the values of the a, g and r variables. The a variable stores the alpha value (the transparency of the image). If we reduce this value we make the image darker and increasing it makes the image lighter. Since the control stick value can be either positive or negative we simply need to add the result to the variable.
We do the same with the r and g variables to control the amount of red and green in our image. As we move the control stick down the red and green leaves the image, leaving us with just blue. This happens as the transparency increases, allowing us to see more of the black screen behind the image. This gives us a lovely dark blue effect.
This sort of technique would be perfect for a game with lots of dialogue between characters.
Why not try changing the background image and creating different lighting effects?
See you in the next tutorial!
Functions and Keywords used in this tutorial
clear(), drawImage(), drawImageEx(), else, endIf, gWidth(), gHeight(), if, loadImage(), loop, repeat, then, update()