
Basic Game Tutorial 2: Creating a Level
Hello again! Glad to see you haven't given up yet!
We've got our background image, now it's time to create a level for our platform game. Before we go adding all kinds of complicated things, let's focus on just the basics.
Using a Tilesheet
We want a level to have something to walk on, some pits to fall into, and perhaps a couple of platforms for us to jump on.
When game designers create a level, they use something called a tileset or tilesheet. This is an image file which contains lots of different tiles - the building blocks for a level. We'll be using more of Kenney's awesome artwork for our level. Take a look at the image of a portion of the tilesheet we'll be using below:
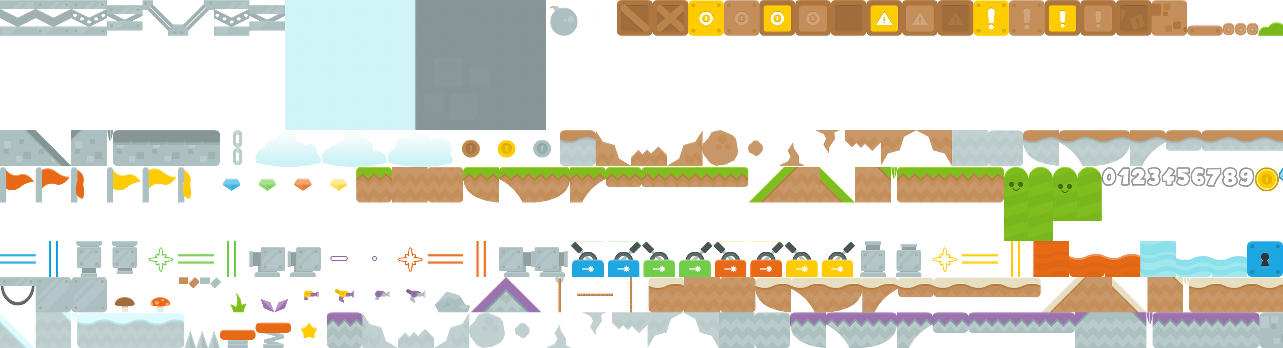
Wow! As you can see, this tilesheet contains all of the building blocks we would need for a level. We even have lots of different themes in the same sheet! This means you could add some very different sections to your game once we're finished!
The important thing to understand here is that each tile has a number. Let's take a closer look at a couple of those tiles from the top left corner.

The tile numbers begin at 0 and move up as we go. Imagine a grid around each tile in the tilesheet to help picture this.
The tiles we will be using to draw the level are:
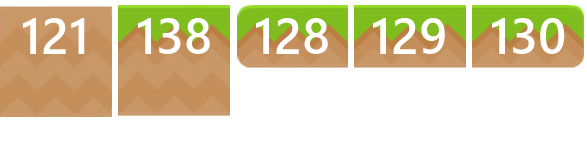
We have 5 tiles, each with different numbers. We need to use an array to arrange these tiles into the level we want, but before we do that, we can make our lives a little easier by storing these tiles into an array.
Enough talk, let's get started!
Loading the Tilesheet Image
Just like before, we need to use the loadImage() function to load and store the tilesheet in a variable. We'll be doing this right at the start of our program. Below, we've added a new line on line 2. Add this to your code:
2. tilesheet = loadImage( "Kenney/superPlatformPack", false )We define a variable called tilesheet and use the loadImage() function to store the tilesheet. Again, we want no filter applied to this so the second argument is false.
Done!
Creating a Look-Up Table
Earlier, we mentioned that we could make things easier for ourselves by storing all the tiles we want in a simple array. Then, when we create our level array, rather than having a huge amount of 3 digit numbers all over the place, we will have nice single digit numbers instead.
An array used in this way is called a look-up table. It's a table that we use to look things up!
Let's create that look-up table now. We'll call it tiles.
We'll add this on line 7. Here's how the first part of your project should look:
  1. background = loadImage( "Kenney/backgrounds", false )
  2. tilesheet  = loadImage( "Kenney/superPlatformPack", false )
  3.
  4. screenX = 0
  5. screenY = 0
  6.
  7. tiles = [ 121, 138, 128, 129, 130 ]
That's it! We've stored the numbers for the tiles we want in a simple array.
With this, we can easily access any tile number from the table, and changing the tiles later will be a breeze!
If we wanted to use tile number 121, we would access that with tiles[0]. If we wanted tile number 130 we would use tiles[4].
Building the Level using a Multi-Dimensional Array
We are going to create a level using numbers. Imagine creating a large grid as big as the screen, then filling in the squares with the numbers of the tiles we want to place there.
Something a little like this:

We will also have to fill in all of the blank spaces with a number we can use to determine they are empty. We will use -1 for this. This -1 will come in very useful for a few things later.
Rather than having a huge array full of -1's, let's use half of this grid instead to make our code more readable. We can then use an offset when the time comes to draw the level.
Confused? Here's what we're trying to create:
Almost every old 2D game works in this way. You can imagine any 2D level as a grid of numbers, each number representing a different tile to draw.
With -1's in all the empty tiles, we have an easy way to tell if any particular tile is something we want to draw. It will also be used when the time comes to collide with the level, checking to see if a tile is empty and can be moved through.
Anyway, let's get back to some coding and create our array! It is probably a good idea to copy and paste this section of code into your project. Entering this whole array manually is quite long-winded!
  9. level = [
 10.     [ -1, -1, -1, -1, -1, -1, -1, -1, -1, -1, -1, -1, -1, -1, -1, -1, -1, -1, -1, -1, -1, -1, -1, -1, -1, -1 ],
 11.     [ -1, -1, -1, -1, -1, -1, -1, -1, -1, -1, -1, -1, -1, -1, -1, -1, -1, -1, -1, -1, -1, -1, -1, -1, -1, -1 ],
 12.     [ -1, -1, -1, -1, -1, -1, -1, -1, -1, -1, -1, -1, -1,  2,  3,  4, -1, -1, -1, -1, -1, -1, -1, -1, -1, -1 ],
 13.     [  1,  1,  1,  1, -1, -1,  1,  1,  1,  1,  1,  1, -1, -1, -1, -1, -1,  1,  1,  1,  1,  1,  1,  1,  1,  1 ],
 14.     [  0,  0,  0,  0, -1, -1,  0,  0,  0,  0,  0,  0, -1, -1, -1, -1, -1,  0,  0,  0,  0,  0,  0,  0,  0,  0 ],
 15.     [  0,  0,  0,  0, -1, -1,  0,  0,  0,  0,  0,  0, -1, -1, -1, -1, -1,  0,  0,  0,  0,  0,  0,  0,  0,  0 ]
 16. ]
There we go! It's very easy to get confused by such a huge amount of numbers, but now we know exactly what they are for. You can almost see the level in the numbers!
Think of this array as 6 rows of 26 columns. This will help to understand things when we come to drawing the level.
You might notice our array is longer than the example picture. That's as it should be! We want our level to be longer than the screen, when we move forward in the game, the rest of the level will be revealed to us!
Before we go ahead and draw the level in our main loop, we need to set up a couple of very helpful variables. They will store the total number of tiles in the height of the screen, and the offset we will use when drawing our level. Add the following two lines to your code:
 18. levelHeight = 12
 19. levelOffset = levelHeight - len( level )
Our screen will be 12 tiles tall, so levelHeight is 12. Our level array is only 6 rows high, so without an offset this will result in something not quite right when we draw it. You'll see!
To store the correct offset, we take the levelHeight variable and subtract the number of rows in our level array. Rather than use the number 6, we have used the len() function. This means we can add more to the level later and everything will be taken care of!
Another very useful thing to have would be a variable to store the size of a single tile in pixels. We'll be using this all over the place in the program, so we should make it a global variable (outside of any loops or functions so it can be accessed from anywhere in the program.). Because the size of one tile in pixels will depend on whether the console is docked or undocked, we must update this variable in the main loop. For now, we can simply define it as 0.
20. tSize = 0Alright, enough of that. Let's draw this level. This next part will take place inside the main game loop. To begin with, we must create a variable to store the scale multiplier for drawing to the screen. The actual size of the tiles from our sheet are very small indeed! If we want them to look good on screen, we must multiply their size by a scale.
This scale variable will be used again and again throughout our program:
 22. loop
 23.     clear()
 24.
 25.     screenW = gwidth()
 26.     screenH = gheight()
 27.     scale = screenH / ( tileSize( tilesheet, 121 ).y * levelHeight )
 28.
 29.     drawImage( background, -screenX, -screenY, screenH / imageSize( background ).y )
 30.
 31.     update()
 32. repeat
We create the scale variable on line 27 above. To calculate the scale, we take the height of the screen in pixels ( screenH ) and divide it by the height of a level tile ( tileSize( tilesheet, 121 ) ). This tells us how many single tiles will fit into the height of the screen. We then multiply the result by our desired level height.
Now let's use that scale to update the tSize variable, giving us the size of our scaled up tiles in pixels:
 22. loop
 23.     clear()
 24.
 25.     screenW = gwidth()
 26.     screenH = gheight()
 27.     scale = screenH / ( tileSize( tilesheet, 121 ).y * levelHeight )
 28.     tSize = scale * tileSize( tilesheet, 121 ).y
 29.
 30.     drawImage( background, -screenX, -screenY, screenH / imageSize( background ).y )
 31.
 32.     update()
 33. repeat
On line 28 above we multiply the original size of a level tile (tileSize( tilesheet, 121 ) by our scale variable to give us the exact height of a scaled-up tile. Very useful indeed!
Drawing the Level Using a For Loop
Here is the clever part. Rather than using a different drawSheet() function for each tile, we will use a for loop to count over the level array and call the drawSheet() function for each number.
Since we are using a two-dimensional array, we need something fancy called a nested for loop. It's really just a for loop inside a for loop!
Add the lines 32 to 40 below to your project:
 22. loop
 23.     clear()
 24.
 25.     screenW = gwidth()
 26.     screenH = gheight()
 27.     scale = screenH / ( tileSize( tilesheet, 121 ).y * levelHeight )
 28.     tSize = scale * tileSize( tilesheet, 121 ).y
 29.
 30.     drawImage( background, -screenX, -screenY, screenH / imageSize( background ).y )
 31.
 32.     for row = 0 to len( level ) loop
 33.         for col = 0 to len( level[0] ) loop
 34.             if level[row][col] >= 0 then
 35.                 x = col * tsize
 36.                 y = ( row + levelOffset ) * tsize
 37.                 drawSheet( tilesheet, tiles[level[row][col]], x, y, scale )
 38.             endif
 39.         repeat
 40.     repeat
 41.
 42.     update()
 43. repeat
drawSheet()
The drawSheet() function is something we will be using a lot, so it's very useful to fully understand it. Let's just quickly cover what the arguments are:
drawSheet( file, tile, xPosition, yPosition, scale )The first argument is the file we want to draw from.
The second is the tile number we want to draw.
Next, we have the x and y screen positions we want to draw to.
Last is the scale multiplier applied to the tile drawn.
The For Loop
Let's take a closer look at that for loop to really understand what's happening.
 32.     for row = 0 to len( level ) loop
 33.         for col =  to len( level[0] ) loop
 34.             if level[row][col] >= 0 then
 35.                 x = col * tsize
 36.                 y = ( row + levelOffset ) * tsize
 37.                 drawSheet( tilesheet, tiles[level[row][col]], x, y, scale )
 38.             endif
 39.         repeat
 40.     repeat
In these loops we create two variables called row and col, to count rows and columns. They count from 0 to the length of the dimensions of our level array. Our level array is 6 rows of 26 columns.
The inside for loop (lines 33 to 39) count over each column, for a total of 26 repetitions. The outside for loop counts over each row, for a total of 6 repetitions. This covers every single position in our level array, no matter how long we make it.
For each repetition, we check if the position in the level array which corresponds to the number in the row and col variables is greater than or equal to 0. If it is, we use the drawSheet() function to draw the tile from the tiles array on screen.
Let's look at an example. Imagine that row = 4 and col = 9.
The if statement on line 34 would read:
34. if level[4][9] >= 0 thenIf we take a look at our level array, we can see that column 9 of row 4 is a 0. This is indeed greater than or equal to 0! So, with that check complete, let's put those values into the drawSheet() line:
37. drawSheet( tilesheet, tiles[level[9][4]], x, y, scale )We know that level[9][4] is a 0, so really the line looks like this:
drawSheet( tilesheet, tiles[0], x, y, scale )Looking at our tiles array, we can see that tiles[0] is the number 121. So really, the line looks like this:
drawSheet( tilesheet, 121, x, y, scale )This drawSheet() function is repeated for a total of 156 times! Each time, the values in the function are different, drawing the correct tile from our array at the correct positions.
End Result
Congratulations! You've made it to the end of part 2 of the basic game tutorial. We should have our level being drawn beautifully on the screen. Try putting your Nintendo Switch into the dock while connected to a TV screen, you'll see our program scales the level and background perfectly to look awesome no matter what screen we use!
Just to double check, your entire program should now look like this:
  1. background = loadImage( "Kenney/backgrounds", false )
  2. tilesheet  = loadImage( "Kenney/superPlatformPack", false )
  3.
  4. screenX = 0
  5. screenY = 0
  6.
  7. tiles = [ 121, 138, 128, 129, 130 ]
  8.
  9. level = [
 10.     [ -1, -1, -1, -1, -1, -1, -1, -1, -1, -1, -1, -1, -1, -1, -1, -1, -1, -1, -1, -1, -1, -1, -1, -1, -1, -1 ],
 11.     [ -1, -1, -1, -1, -1, -1, -1, -1, -1, -1, -1, -1, -1, -1, -1, -1, -1, -1, -1, -1, -1, -1, -1, -1, -1, -1 ],
 12.     [ -1, -1, -1, -1, -1, -1, -1, -1, -1, -1, -1, -1, -1,  2,  3,  4, -1, -1, -1, -1, -1, -1, -1, -1, -1, -1 ],
 13.     [  1,  1,  1,  1, -1, -1,  1,  1,  1,  1,  1,  1, -1, -1, -1, -1, -1,  1,  1,  1,  1,  1,  1,  1,  1,  1 ],
 14.     [  0,  0,  0,  0, -1, -1,  0,  0,  0,  0,  0,  0, -1, -1, -1, -1, -1,  0,  0,  0,  0,  0,  0,  0,  0,  0 ],
 15.     [  0,  0,  0,  0, -1, -1,  0,  0,  0,  0,  0,  0, -1, -1, -1, -1, -1,  0,  0,  0,  0,  0,  0,  0,  0,  0 ]
 16. ]
 17.
 18. levelHeight = 12
 19. levelOffset = levelHeight - len( level )
 20. tSize = 0
 21.
 22. loop
 23.     clear()
 24.
 25.     screenW = gwidth()
 26.     screenH = gheight()
 27.     scale = screenH / ( tileSize( tilesheet, 121 ).y * levelHeight )
 28.     tSize = scale * tileSize( tilesheet, 121 ).y
 29.
 30.     drawImage( background, -screenX, -screenY, screenH / imageSize( background ).y )
 31.
 32.     for row = 0 to len( level ) loop
 33.         for col = 0 to len( level[0] ) loop
 34.             if level[row][col] >= 0 then
 35.                 x = col * tsize
 36.                 y = ( row + levelOffset ) * tsize
 37.                 drawSheet( tilesheet, tiles[level[row][col]], x, y, scale )
 38.             endif
 39.         repeat
 40.     repeat
 41.
 42.     update()
 43. repeat
Make sure we're matching up to your project perfectly, and then we'll see you in the next tutorial. Let's put our character on the screen!
Functions and Keywords used in this tutorial
clear(), drawImage(), else, endIf, for, gHeight(), gWidth(), if, len(), loadImage(), loop, repeat, tileSize(), then, to, update()